> ## Documentation Index
> Fetch the complete documentation index at: https://docs.tess.im/llms.txt
> Use this file to discover all available pages before exploring further.
# Omnibar
> Bottom input on Mission Control — route tasks and use /hire to create Digital Employees
## Overview
The **Omnibar** is the text field at the bottom of the Mesh Canvas. Use it to:
1. **Route a task** — type work in plain language and submit to the right employee or flow
2. **Hire with `/hire`** — describe a new role; Tess configures a Digital Employee for you
The Omnibar is not a global command palette — there is no Cmd+K shortcut, and you cannot pause or stop employees from here. Click the field to focus it.
 ## Route a task
Type what you need done — for example, “Summarize yesterday’s support tickets for the weekly standup” — and submit. Cowork routes the request based on context (selected employee, squad, or workspace rules).
For predictable routing, select the target employee on the Mesh first, then type in the Omnibar.
## `/hire` slash command
### Start the command
1. Click the Omnibar
2. Type `/`
3. Choose **`/hire`** from the floating menu (visible when you can create employees)
4. Add a plain-language description — e.g. `/hire someone to monitor competitor pricing weekly`
5. Submit
## Route a task
Type what you need done — for example, “Summarize yesterday’s support tickets for the weekly standup” — and submit. Cowork routes the request based on context (selected employee, squad, or workspace rules).
For predictable routing, select the target employee on the Mesh first, then type in the Omnibar.
## `/hire` slash command
### Start the command
1. Click the Omnibar
2. Type `/`
3. Choose **`/hire`** from the floating menu (visible when you can create employees)
4. Add a plain-language description — e.g. `/hire someone to monitor competitor pricing weekly`
5. Submit
 ### What happens next
Cowork runs a short recruiting sequence, then places the new employee on the Mesh. The first run often starts immediately; in Supervised mode you may need to approve the initial plan in the drawer.
Full walkthrough: [Creating a Digital Employee](/en/cowork/digital-employees/configuracao-basica/criando-um-digital-employee).
## Hire dropdown (alternative)
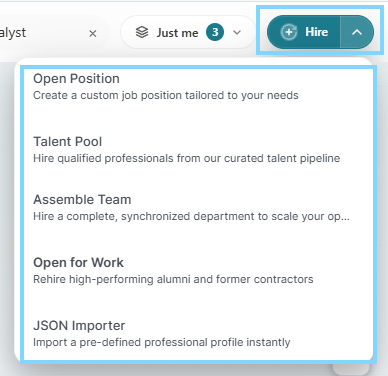
For full control over identity, Work Mode, Work Cycle, and Advanced settings, use **Hire → Open position** instead of `/hire`. Other menu options include **Talent Pool** and **Assemble Team** when available in your workspace.
## Permissions
`/hire` and **Hire** require permission to create and invoke Digital Employees in the workspace. If options are missing, ask your workspace admin.
## Next steps
* [Creating a Digital Employee](/en/cowork/digital-employees/configuracao-basica/criando-um-digital-employee)
* [Mesh Canvas Overview](/en/cowork/mesh-canvas/mesh-canvas-overview)
* [Agent Lifecycle](/en/cowork/digital-employees/ciclo-de-vida/agent-lifecycle)
### What happens next
Cowork runs a short recruiting sequence, then places the new employee on the Mesh. The first run often starts immediately; in Supervised mode you may need to approve the initial plan in the drawer.
Full walkthrough: [Creating a Digital Employee](/en/cowork/digital-employees/configuracao-basica/criando-um-digital-employee).
## Hire dropdown (alternative)
For full control over identity, Work Mode, Work Cycle, and Advanced settings, use **Hire → Open position** instead of `/hire`. Other menu options include **Talent Pool** and **Assemble Team** when available in your workspace.
## Permissions
`/hire` and **Hire** require permission to create and invoke Digital Employees in the workspace. If options are missing, ask your workspace admin.
## Next steps
* [Creating a Digital Employee](/en/cowork/digital-employees/configuracao-basica/criando-um-digital-employee)
* [Mesh Canvas Overview](/en/cowork/mesh-canvas/mesh-canvas-overview)
* [Agent Lifecycle](/en/cowork/digital-employees/ciclo-de-vida/agent-lifecycle)