> ## Documentation Index
> Fetch the complete documentation index at: https://docs.tess.im/llms.txt
> Use this file to discover all available pages before exploring further.
# Embedding
**IMPORTANT:**\
Feature available only on PRO, Business, and Enterprise plans.
Make your Tess agent available directly within websites and applications, as a chat widget or embedded component. Ideal for customer support, lead capture, onboarding, and internal assistants.
### **What is it?**
The Embedding feature allows you to embed a Tess agent into:
* institutional websites
* customer logged-in areas
* your own products / SaaS
* intranets and internal portals
Tess generates an embed code (usually a script or iframe) for you to paste into your website/app. From there, your users can chat with the agent directly within that interface.
### Why it matters
The user does not need to leave your website to talk to the agent.
Support, FAQ, and onboarding agents always available.
Sales agents help qualify and guide leads in real time.
The same agent can be used across multiple channels (website, app, internal and external).
### How to generate an embed code?
The first step is creating and testing the agent (prompt, Knowledge Base, Tools, etc.).
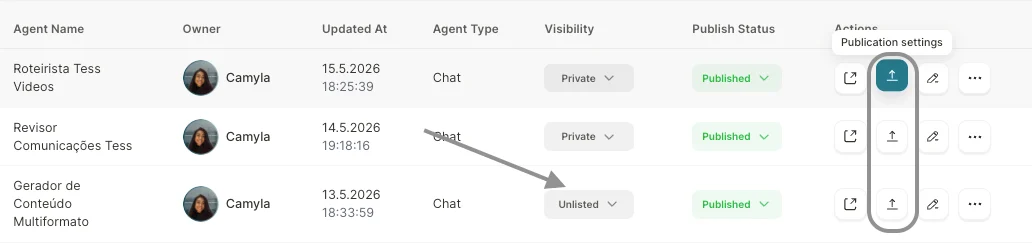
Configure the visibility, as your agent cannot be private in order to enable the Embed feature.
In the Agent Studio agent list, click the publication settings to access the agent's detailed settings.
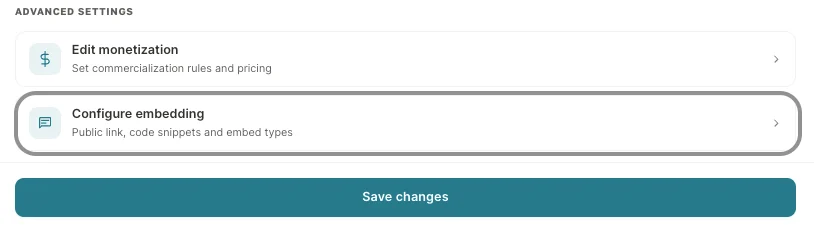
 Scroll to the bottom "Configure Embedding" option.
 Choose the embed format and use the code in the HTML of your website/app and activate the public access option.
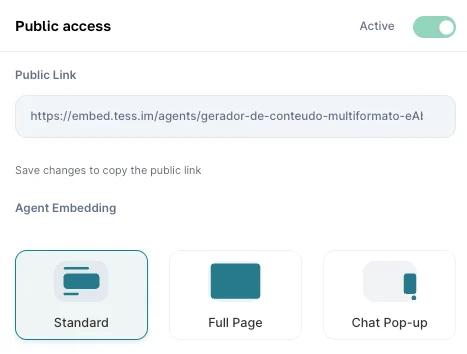 This way, the chat widget or component will start appearing for visitors, connected to your agent.
**Best practices**
* Start by embedding in test/staging environments before going to production.
* Make sure the agent is configured and tested for external use.
* Verify that your company's privacy policies cover interactions with AI agents.
This way, the chat widget or component will start appearing for visitors, connected to your agent.
**Best practices**
* Start by embedding in test/staging environments before going to production.
* Make sure the agent is configured and tested for external use.
* Verify that your company's privacy policies cover interactions with AI agents.