> ## Documentation Index
> Fetch the complete documentation index at: https://docs.tess.im/llms.txt
> Use this file to discover all available pages before exploring further.
# Visibility
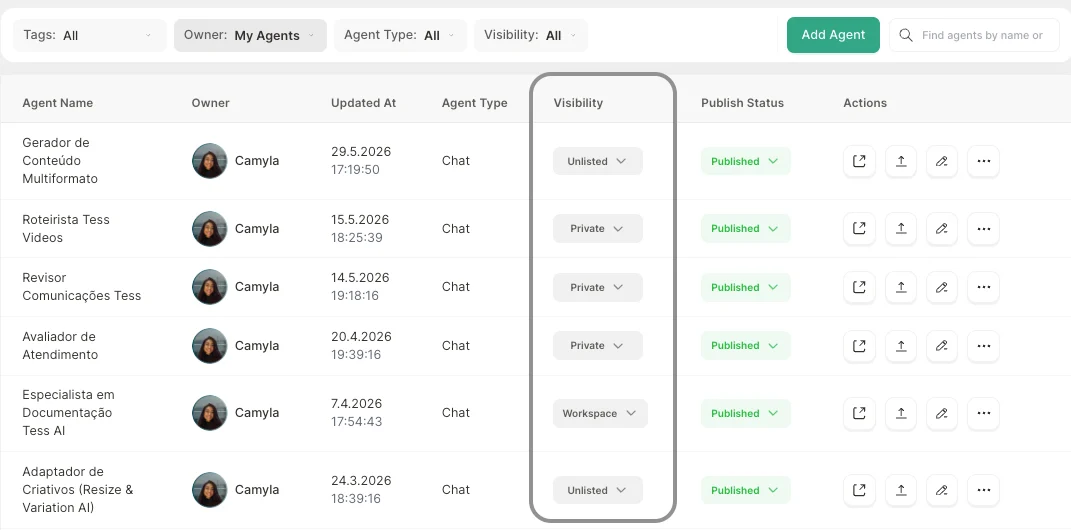
Visibility defines the privacy level of the agent created in Agent Studio. You can choose between the following levels:
Available only to members of your workspace. This is the ideal mode to maintain control over internal agents.
Visible to the creator and, when the workspace policy allows, to profiles with **governance permissions** to audit private agents from other members — being a workspace member alone is not enough to view others' private agents.
Available for use by the entire Tess user community and listed in the Marketplace.
Does not appear in the Marketplace, but anyone on Tess who receives the link can access it.
 ### **Why is it important?**
* Security and confidentiality: agents with sensitive data should be private or limited to the workspace.
* Controlled sharing: experimental agents can be unlisted, accessible only via link.
* Distribution and community: mature agents can be made public and shared with the entire Tess base.
### Understanding Visibility Levels in detail
All workspace members can access the agent. It is great for creating agents within companies so that other colleagues can use them.
By default, only the creator can see the agent in the listing. To **audit or access** a private agent from **another member**, **explicit governance permission** in the workspace is required (simply being an Owner does not automatically grant access to others' private agents). Ideal for drafts, tests, or personal agents.
In this case, any Tess user can find and use the agent, making it available and listed in the Marketplace. These are used for agents ready for reuse by others (more generic and broad), market templates, showcases, etc.
They cannot be found in the Marketplace and only people with the direct link can open them. It is used when you want to share with specific clients, partners, or in beta phases for testing by others.
### **Governance and private content in the workspace**
The platform reinforces that **visibility** (public, workspace, private, unlisted) is not the only control: for **private agents and results of other members** within the same workspace, an explicit **governance** model applies:
* **Same rules across all flows:** AI Studio, chat, usage history, access to linked documents, and **template/execution APIs** apply the same authorization. There is no “shortcut” in the API that exposes another user’s private content without proper permission.
* **No role-based bypass:** having an Owner or administrator role **does not replace**, by itself, governance permission to **read or audit** private agents and **private sessions/results** from others — when the policy requires explicit permission, access is clearly denied.
* **Denial experience:** unauthorized attempts lead to a **private content** experience (access denied), instead of ambiguous messages that do not make it clear whether the resource exists.
* **Usage history:** items you cannot open due to lack of permission appear as **restricted**, without any link that simulates improper access.
Who can audit private content and under which conditions depends on the **workspace permissions** and the **governance features** of your plan (often in **Enterprise** scenarios). Also check [Members and Permissions](/pt/members-permissions).
### **How to adjust agent visibility**
When creating the Agent, you can define visibility within Agent Studio by selecting your preferred option. The agent will be created with that setting.
### **Why is it important?**
* Security and confidentiality: agents with sensitive data should be private or limited to the workspace.
* Controlled sharing: experimental agents can be unlisted, accessible only via link.
* Distribution and community: mature agents can be made public and shared with the entire Tess base.
### Understanding Visibility Levels in detail
All workspace members can access the agent. It is great for creating agents within companies so that other colleagues can use them.
By default, only the creator can see the agent in the listing. To **audit or access** a private agent from **another member**, **explicit governance permission** in the workspace is required (simply being an Owner does not automatically grant access to others' private agents). Ideal for drafts, tests, or personal agents.
In this case, any Tess user can find and use the agent, making it available and listed in the Marketplace. These are used for agents ready for reuse by others (more generic and broad), market templates, showcases, etc.
They cannot be found in the Marketplace and only people with the direct link can open them. It is used when you want to share with specific clients, partners, or in beta phases for testing by others.
### **Governance and private content in the workspace**
The platform reinforces that **visibility** (public, workspace, private, unlisted) is not the only control: for **private agents and results of other members** within the same workspace, an explicit **governance** model applies:
* **Same rules across all flows:** AI Studio, chat, usage history, access to linked documents, and **template/execution APIs** apply the same authorization. There is no “shortcut” in the API that exposes another user’s private content without proper permission.
* **No role-based bypass:** having an Owner or administrator role **does not replace**, by itself, governance permission to **read or audit** private agents and **private sessions/results** from others — when the policy requires explicit permission, access is clearly denied.
* **Denial experience:** unauthorized attempts lead to a **private content** experience (access denied), instead of ambiguous messages that do not make it clear whether the resource exists.
* **Usage history:** items you cannot open due to lack of permission appear as **restricted**, without any link that simulates improper access.
Who can audit private content and under which conditions depends on the **workspace permissions** and the **governance features** of your plan (often in **Enterprise** scenarios). Also check [Members and Permissions](/pt/members-permissions).
### **How to adjust agent visibility**
When creating the Agent, you can define visibility within Agent Studio by selecting your preferred option. The agent will be created with that setting.
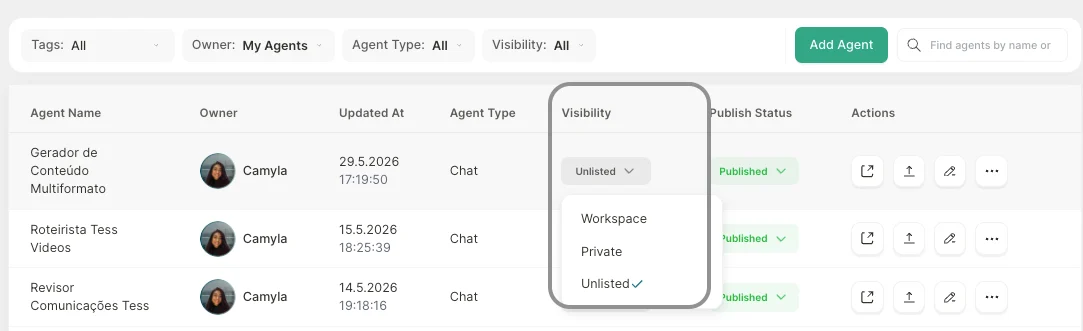 Additionally, you can always adjust the visibility level in Agent Studio:
1. Open Agent Studio
2. Locate the agent you want to configure. You can search by name, type, visibility, or owner.
3. Check the Visibility column and choose the desired level
**IMPORTANT**\
\
**When publishing an agent, it goes through a review before appearing to everyone**
When you set an agent as **Public** in AI Studio, TESS automatically reviews the content — text and images. If everything is in order, it is approved and becomes available to the community. The process is automatic and happens in seconds.
### **Detailed Agent Information (to make it public)**
To access it, just hover next to the status and click the pencil icon.
Additionally, you can always adjust the visibility level in Agent Studio:
1. Open Agent Studio
2. Locate the agent you want to configure. You can search by name, type, visibility, or owner.
3. Check the Visibility column and choose the desired level
**IMPORTANT**\
\
**When publishing an agent, it goes through a review before appearing to everyone**
When you set an agent as **Public** in AI Studio, TESS automatically reviews the content — text and images. If everything is in order, it is approved and becomes available to the community. The process is automatic and happens in seconds.
### **Detailed Agent Information (to make it public)**
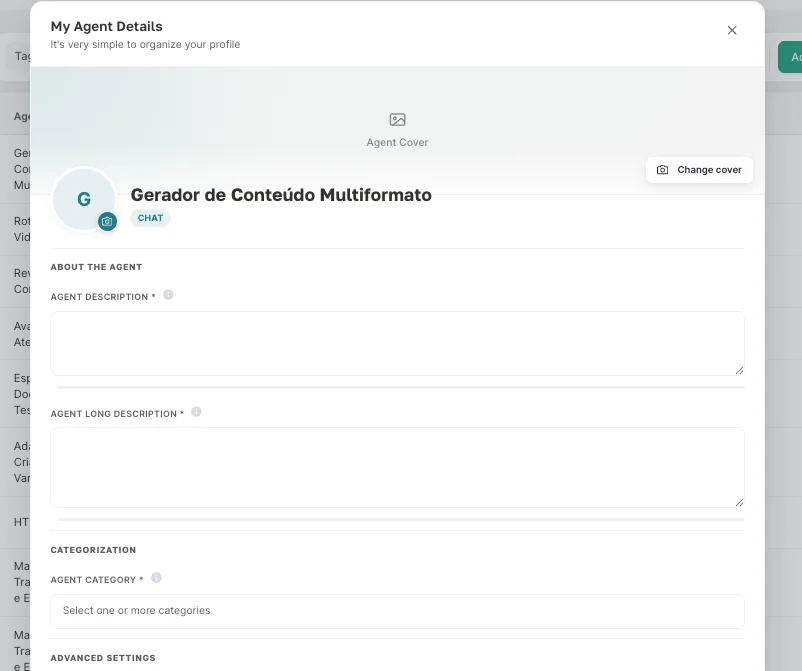
To access it, just hover next to the status and click the pencil icon.
 This will open the detailed agent settings:
 ### Required fields for public publishing
Before publishing an agent publicly, make sure these fields are filled. They will be highlighted on the Publishing Settings screen if missing.
1. **Short Description:** What the agent does, in one paragraph
2. **Long Description:** Detailed use cases and benefits
3. **Category:** Area of activity (e.g.: Marketing, HR, Sales)
4. **Cover image and avatar:** Recommended — improves presentation in the marketplace
**Rejected images are automatically removed** from the agent to prevent improper display.
### **How to resolve a rejection**
Hover over the red icon next to the visibility badge to see which area failed (text, avatar, or cover).
Open the agent settings and adjust the indicated field — replace the image or revise the text according to the tooltip guidance.
No additional action is required. When you save, the agent returns to *Under review* and the automatic analysis is re-executed.
### Required fields for public publishing
Before publishing an agent publicly, make sure these fields are filled. They will be highlighted on the Publishing Settings screen if missing.
1. **Short Description:** What the agent does, in one paragraph
2. **Long Description:** Detailed use cases and benefits
3. **Category:** Area of activity (e.g.: Marketing, HR, Sales)
4. **Cover image and avatar:** Recommended — improves presentation in the marketplace
**Rejected images are automatically removed** from the agent to prevent improper display.
### **How to resolve a rejection**
Hover over the red icon next to the visibility badge to see which area failed (text, avatar, or cover).
Open the agent settings and adjust the indicated field — replace the image or revise the text according to the tooltip guidance.
No additional action is required. When you save, the agent returns to *Under review* and the automatic analysis is re-executed.
**Best practices**
* Start with the agent as Private during the testing phase.
* When it is mature, switch to Workspace so the whole team can use it.
* Only make Public what you truly want to share with the community, without sensitive data.
* Use Unlisted for pilots with selected clients, without exposing it in the Marketplace.
### Required fields for public publishing
Before publishing an agent publicly, make sure these fields are filled. They will be highlighted on the Publishing Settings screen if missing.
1. **Short Description:** What the agent does, in one paragraph
2. **Long Description:** Detailed use cases and benefits
3. **Category:** Area of activity (e.g.: Marketing, HR, Sales)
4. **Cover image and avatar:** Recommended — improves presentation in the marketplace
**Rejected images are automatically removed** from the agent to prevent improper display.
### **How to resolve a rejection**
Hover over the red icon next to the visibility badge to see which area failed (text, avatar, or cover).
Open the agent settings and adjust the indicated field — replace the image or revise the text according to the tooltip guidance.
No additional action is required. When you save, the agent returns to *Under review* and the automatic analysis is re-executed.
### Required fields for public publishing
Before publishing an agent publicly, make sure these fields are filled. They will be highlighted on the Publishing Settings screen if missing.
1. **Short Description:** What the agent does, in one paragraph
2. **Long Description:** Detailed use cases and benefits
3. **Category:** Area of activity (e.g.: Marketing, HR, Sales)
4. **Cover image and avatar:** Recommended — improves presentation in the marketplace
**Rejected images are automatically removed** from the agent to prevent improper display.
### **How to resolve a rejection**
Hover over the red icon next to the visibility badge to see which area failed (text, avatar, or cover).
Open the agent settings and adjust the indicated field — replace the image or revise the text according to the tooltip guidance.
No additional action is required. When you save, the agent returns to *Under review* and the automatic analysis is re-executed.
**Best practices**
* Start with the agent as Private during the testing phase.
* When it is mature, switch to Workspace so the whole team can use it.
* Only make Public what you truly want to share with the community, without sensitive data.
* Use Unlisted for pilots with selected clients, without exposing it in the Marketplace.