What is this Step?
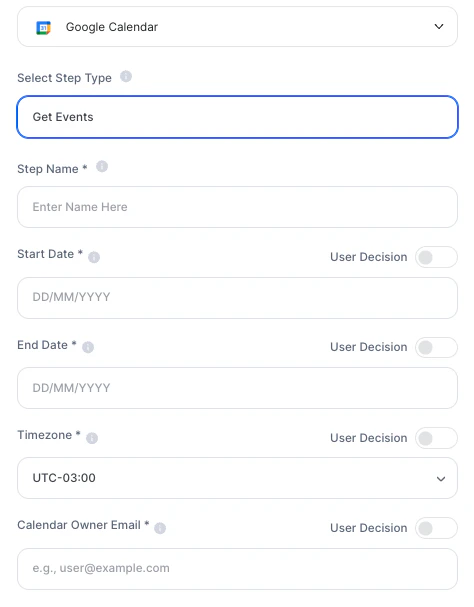
This integration provides two actions within AI Studio:- Get Events: Reads events from a specific time range in the calendar and brings this information into the agent’s context.
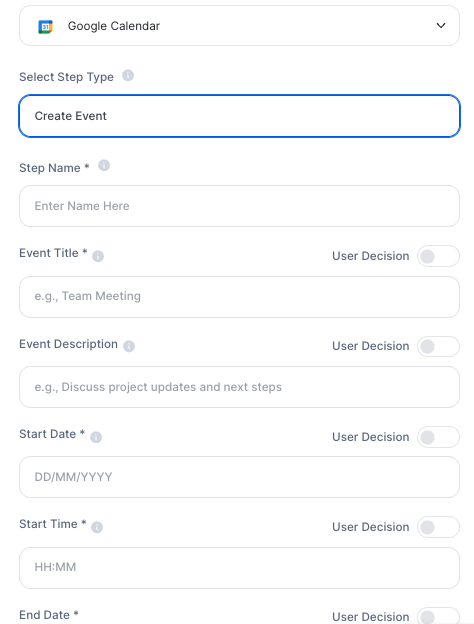
- Create Event: Creates a new event in the calendar with full details: title, description, date, time, guests, and notifications.
How Steps work in Tess: read before configuring
This is the most important point to use the integration correctly: All App Integration steps run before any interaction with the user. This means that when a user opens the chat and starts talking to the agent, the steps have already been executed. Therefore, the agent cannot:- Wait for user approval to create the event
- Use information provided mid-conversation to trigger the step
- Use User Inputs that were filled before the conversation started
- Use pre-configured fixed information in the step
- Use User Decision, which also collects the required data before the conversation
Practical summary:
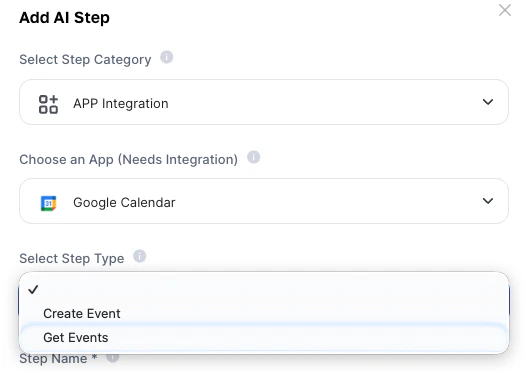
Where to find it
- Go to AI Studio
- Click Add AI Step
- In Select Step Category, choose App Integration
- In Choose an App, select Google Calendar
- In Select Step Type, choose Create Event or Get Events
How to use (Quickstart)
Configure the following fields:NOTE:All fields marked with User Decision can be dynamically filled via inputs or fixed in the step configuration.
The events found in this period will be available in the agent’s context to be used in the response or in other steps.
Deeper explanation
Since steps run before the conversation, the usage logic changes. The agent does not create events “mid-conversation” — it starts the conversation with the event already created (or with the data already collected). The correct design is:Practical examples
Onboarding agent that automatically schedules a meeting
- The user fills in the data at the beginning (User Inputs): name, email, available date and time.
- The Create Event step uses these variables and creates the event before the chat starts.
- The agent opens the conversation already confirming: “Hello! Your onboarding meeting has been scheduled for [date] at [time]. Here’s what we’ll cover…”_
Daily schedule briefing
- A Text Agent is automatically triggered (via Make, for example) every morning.
- The Get Events step fetches all events of the day.
- The agent generates a structured summary of the schedule and sends it via email or Slack to the user.
Trigger via external form
- Integration via N8N or Zapier triggers the Tess Text Agent with form data as inputs.
- The Create Event step creates the event and sends the invite automatically.
- No human interaction is required in the process.
Pay attention to the following points:
- Mandatory authentication: Google Calendar must be integrated with your Tess account before using the step.
- The step always runs: Regardless of the conversation context, the step will execute when the agent starts. Ensure input data is always available.
- Credit consumption: Each step execution consumes credits from your plan.